How Does Teflon Tape Help Seal Water Supply Line Threads
Teflon tape seals water supply lines by filling in the gaps and grooves of the threads, and lubricating them so they can be tightened more deeply. ... Read More
Same-Day Service Available
Need a Plumber in Knoxville? We’re Ready to Help!


To install a sump pump battery backup, disconnect the power, mount the backup pump, attach the check valve, connect the discharge piping, wire the controller to the battery, set the float switch, and test the system by simulating a power outage. This ensures the pump activates automatically during power failures and protects your home from basement flooding.
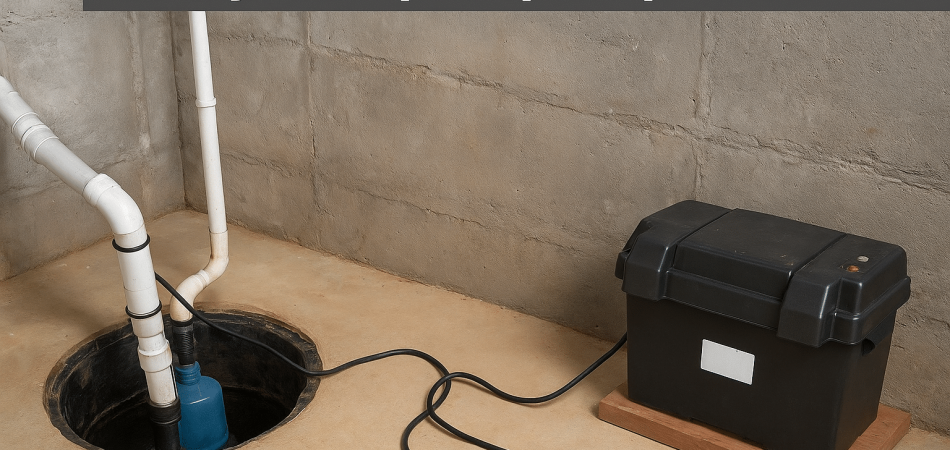
A sump pump battery backup system is a specialized emergency unit powered by a separate, heavy-duty battery. This backup pump immediately takes over if the power fails during a storm or if the main pump stops working. It prevents basement flooding and provides homeowners with the solid reassurance that their home stays dry, even in the worst weather.
Protect your home. Contact Tennessee Standard Plumbing today for a reliable sump pump backup installation.
The installation of a battery backup for your sump pump includes the following 10 steps:
Locate the power line running from the main sump pump. Just unplug the pump’s outlet from the socket. Power thus gets cut off to the unit in the pit. An extra precaution is to check the main electrical panel of the home. Find the dedicated circuit breaker, the one marked “Sump” or “Basement“, and turn the switch off. That gives added assurance before you handle the equipment.
Many sump pumps plug into a dedicated ground fault circuit interrupter, or GFCI, outlet. Unplugging the cord ensures a safe workspace. Keeping the power off prevents accidental electrocution and damage to the pump. The non-contact voltage tester is a fast and safe check, as it indicates that no power is reaching the outlet.
Carefully separate the main sump pump from the sump basin or the sump pit. Disconnect the existing discharge pipe from the pump itself. Loosen the clamp that holds the pipe at the outlet port by using a screwdriver or wrench. You notice that there is a check valve connected to this pipe; simply loosen the connection below the check valve.
Gently lift the pump out of the basin by using the handle if it comes with one. The pump weighs a few pounds and will be holding some water, so be careful. Placing it on a towel or an old newspaper close by wards off any floor smears while you continue working. Before continuing installation, check that your sump pit is free from any debris. Use a shop vacuum to clean all grime or silt that has built up at the bottom.
Most battery backup sump pump systems include a mounting bracket or frame to attach the backup pump beside the main one securely. Install the backup pump to this bracket with the screws and hardware that came with your kit. Pay close attention to the orientation. The pump outlet needs to face the main discharge line.
The mounting of the pump must allow it to sit level, clear from interference with the primary pump. The pump has to have a stable position to work properly when needed. A secure mount prevents the pump from tipping over and vibrating too much when it runs. Make sure to use stainless steel or brass hardware in the application, as they resist rusting and corrosion, which is beneficial in damp places.
Every sump pump needs a check valve to stop water from flowing backward into the pit. The check valve acts like a one-way door for the water. Take the new check valve from the kit. Attach this valve to the top of the newly mounted backup pump’s outlet port. Make sure to use the proper size of rubber fitting or reducer if the backup pump outlet is smaller than the check valve opening.
Secure the valve firmly using the rubber couplings and hose clamps included in the kit. Tighten the clamps well with a screwdriver or nut driver. A loose connection causes leaks, which defeats the purpose of the pump. Make sure the arrow marked on the check valve points up. The arrow indicates the direction of water flow, which is out of the pit toward the exterior of the house.
Make the connection from the pipe rising from the new check valve to the existing main discharge line. The discharge line carries all water out of your house. A T-fitting or a Y-fitting is needed to join the two discharge lines. Using a hacksaw or a PVC (polyvinyl chloride) pipe cutter, cut a section out of the main pipe to install this new connecting piece.
Apply PVC primer first, followed by PVC cement to the connections for a watertight seal. This prevents any leaks where the pipes join. Ensure the new backup pipe connects above the check valve of the main sump pump. This setup guarantees smooth operation for both units when they pump water. Give the glue connections a full hour to dry and cure before introducing water.
The battery supplies energy to the backup system; therefore, proper placement is important. Place the battery within the battery box/container. The container is designed to protect the battery and keep it stable. Most systems use a deep-cycle marine-type battery. Make sure to use the type recommended by the manufacturer.
Place the battery box at a distance away from the sump pit. A small distance keeps the box safe from splashing water and moisture. The battery has to sit on a sturdy floor. A stable position prevents any toppling during servicing or flooding events. For safety, let the ventilation holes in the battery box remain uncovered to allow gas to escape during charging.
The battery management and pump operations are handled by the backup controller in case of a power failure. Connect cables from the backup pump to the terminals on the controller unit. The red wires connect to the positive ($+$) terminals while the black wires connect to the negative ($-$) terminals. Check the polarity before securing the nuts onto the battery posts.
Follow the wiring diagram in your installation manual very closely. Incorrect wiring prevents the system from charging or running the pump. Next, plug the controller’s power cord into a working wall outlet. This step begins charging the battery right away. The controller unit displays a light or indicator to confirm that it receives power and is charging.
The float switch activates the backup pump when the water reaches a high level. The float switch must be properly positioned inside the sump pit. Place the switch above the float switch of the primary sump pump. This way, the primary pump handles the water first, and the backup only operates in an emergency.
Adjust the height of the float so the backup pump only activates when the water rises to a dangerous level. Secure the float cable to the discharge pipe using the provided clamp. Confirm the float moves freely up and down without hitting the side of the basin and the primary pump. A snagged float switch means the backup pump fails to turn on when needed, so check the clearance repeatedly.
Test the entire system for an operational check. The first part of the test is to simulate a complete power failure. The primary pump and the backup controller are unplugged from their power source. The next step is to slowly fill the sump pit with several buckets of water. Watch the water level rise. A permanent marker is useful to mark the activation level on the wall of the pit.
The backup pump float switch should rise with the water. Once the water reaches the set level, the backup pump must turn on, pump the water out, and shut off once the water lowers. After the test run, plug the main pump and controller back in. Check the controller for any error messages or low-battery signs to ensure it’s working properly.
Secure all wires and tuck them out of the way to avoid accidents. Use zip ties to bundle extra cables and keep the area neat. Make sure the battery box lid is firmly closed, as it protects the battery and connections from moisture, dust, and damage.
Attach a simple label to the wall socket saying, “Sump Pump Controller.” This acts as a reminder to others not to unplug the connection from the outlet. And finally, record the date of installation and the type of battery used. Such a small thing goes a long way in assisting with future maintenance and battery changes. Keep the backup unit’s owner’s manual in a dry place nearby.
Essential safety tips for installing a sump pump battery backup are unplugging the power source, wearing protective gear, and ensuring the battery has proper ventilation.
The essential tips to follow when installing a sump pump battery backup include:
Always unplug the main sump pump from the electrical outlet before you start any work in the pit. You stop all risk of electric shock when you completely remove the power. This single step protects you from injury while handling the wet pump and wiring.
Water and electricity never mix safely. Make sure the area around the sump pit remains dry before you begin the installation process. Use towels or a shop vacuum to clean up any standing water on the basement floor near your workspace. This prevents dangerous slips and eliminates electrical hazards.
Use the necessary hand and eye protection. Wear heavy-duty rubber gloves to protect your hands from the sharp edges of the components and battery acid. Use safety glasses to protect your eyes from debris and water splashing.
Battery backup systems require specific batteries, called deep-cycle marine batteries. Check your backup unit’s manual to ensure you purchase the right type and size. Using the wrong battery prevents the system from charging properly or running the pump long enough.
Batteries release small amounts of explosive hydrogen gas while charging. Place the battery in its designated box and ensure the box has vents that allow this gas to escape safely. Proper ventilation prevents a dangerous buildup of fumes in your enclosed basement space.
Plug the backup controller into a Ground Fault Circuit Interrupter (GFCI) outlet. A GFCI outlet immediately cuts power upon detection of a surge or fault. This is an important safety feature against electrical hazards in wet places like basements.
Take time to read the entire manual that accompanies your battery backup system before picking up a tool. Every brand and model has different specifications with regard to the installation and wiring. Following them ensures the unit works correctly and safely when you need it most.
Keep your tools and equipment organized and away from the edge of the pit. A clear work area prevents you from accidentally knocking tools into the water and tripping over power cords. Good organization leads to a safer and much quicker installation project.
Following these essential safety precautions makes your installation project secure and stress-free. Remember that safety is just as important as the pump itself. A safely installed system provides the most reliable protection for your home during any power outage.
You can test your sump pump battery backup after installation by simulating a power outage, checking the battery charge indicator, and verifying the alarm functions. Testing ensures your system is ready to protect your home.
Test your sump pump battery backup after installation using the following steps:
Look closely at all the connections you made on the backup controller and the battery terminals. Red wires attach to the positive ($+$) connections, and black wires attach to the negative ($-$) connections. Make certain every terminal nut is tight and secure.
The backup controller has indicator lights or a digital screen showing the battery’s status. Check this display immediately after plugging the controller into the wall outlet. The indicator confirms the battery charger works and keeps your battery full and ready.
This is the real test. Unplug the main power cord for your primary sump pump and the controller unit from the wall outlet. This action forces the backup system to switch to Direct Current (DC) power from the battery, just like during a storm.
Now, you need to raise the water level in the sump pit to activate the backup pump. Pour several large buckets of water slowly into the pit until the backup pump’s float switch lifts. Watch for the backup pump to turn on automatically.
After the pump turns on, watch the water flow through the discharge pipe and outside your house. The backup pump removes the water from the pit just as it should. The pump shuts off automatically when the float switch drops to the bottom position.
Most backup systems include an alarm that sounds when the system runs on battery power. Listen for this alarm to sound when the pump runs during the simulated outage. A working alarm gives you crucial alerts about power issues or high water.
Write down the date of this first successful test near the sump pit. Note the battery’s voltage and how long the pump ran on battery power. This log helps you remember when to perform future maintenance and system checks.
Performing this simple test gives you confidence in your new backup system. Knowing your basement stays dry, even when the power goes out, provides immense peace of mind. Make a note to repeat this test every three months to ensure continuous readiness.
You can choose the right sump pump battery backup system by matching your primary pump’s power needs with the battery’s capacity and run time. Check the pump’s gallons-per-hour (GPH) rating and select a battery with enough Amp-Hours (Ah) to keep it running during extended outages. Consider your basement size and how quickly water collects to ensure the backup system can handle real-world demand.
Look for durable, corrosion-resistant materials like cast iron or thermoplastic, along with a reliable float switch that avoids false starts. Extra features—such as alarms, self-testing, or Wi-Fi alerts—make monitoring easier and keep you ahead of potential issues.
If you want a system that’s sized correctly and installed safely, call Tennessee Standard Plumbing. Their certified experts handle everything from selection to installation, ensuring dependable protection when you need it most.
No, a battery backup sump pump does not replace your primary sump pump. The backup unit is designed only for emergency use during power outages or primary pump failure. It uses Direct Current (DC) power from a battery, which provides less power than your main Alternating Current (AC) pump. The primary pump remains your main line of defense against flooding.
Yes, you can install a sump pump battery backup to your existing sump pump. The backup system is installed right next to the main pump inside the same sump pit or basin. You connect the backup pump to your home’s main water discharge line using a special T-fitting. This integration allows both pumps to use the same pipe to move water outside.
Yes, the second battery can increase sump pump runtime significantly during a power outage. When two batteries are connected in parallel, they share the load and double the energy storage. This means the pump keeps working for more hours before the power runs out, which is a big help during long storms.
A sump pump battery backup system during operation is around 80-85 decibels loud, which is comparable to the noise of a loud ringing telephone or a garbage disposal. This noise level comes from the backup pump motor working and the water rushing through the discharge pipe. The system also includes an audible alarm that sounds to alert you when it turns on.
Your sump pump battery backup runs continuously during a power outage for 6 to 12 hours, but this time extends to several days if the pump runs intermittently. Runtime depends on the battery’s Amp-Hour (Ah) rating and how often the pump activates. A larger capacity battery allows the backup pump to run longer when heavy rain occurs.
You can know if your sump pump needs repair or battery backup installation by observing its function and environment. Repair is needed if the pump makes an unusual noise or fails to turn on when the water rises. You need a battery backup if your area experiences frequent power outages or heavy rain, which causes the primary pump to fail. Professional sump pump repair and installation services helps you choose based on your situation.
Yes, you need a separate discharge line for your sump pump battery backup system. The backup pump uses its own small discharge pipe, which then connects to the main discharge pipe using a T-fitting. The system also requires a separate check valve on the backup line to prevent water from flowing back into the pit after the pump shuts off.
Maintenance you should perform on your sump pump battery backup includes checking the battery fluid levels every few months and inspecting the terminals for corrosion. You also need to test the system quarterly by pouring water into the pit to verify that the pump activates. Replace the battery entirely every three to five years for best performance.
You can get emergency sump pump battery system repair service from local, licensed plumbing companies or specialized basement waterproofing contractors. Choose a company that offers 24/7 emergency plumbing service. A professional technician diagnoses electrical faults, repairs connections, and replaces failing components quickly and safely.
Common mistakes you should avoid during sump pump battery backup installation include neglecting to unplug the main pump before starting work. You also avoid connecting the battery cables with reversed polarity (red to negative, black to positive). Another mistake involves failing to secure the float switch, which prevents the pump from activating correctly.
You should test your sump pump battery backup system every three months. The test involves unplugging the unit and pouring water into the pit to make the pump start. It lets you check if the battery keeps its charge, the pump motor works smoothly, and the float switch activates at the right water level.


Teflon tape seals water supply lines by filling in the gaps and grooves of the threads, and lubricating them so they can be tightened more deeply. ... Read More

Backflow preventer testing costs typically range from $50 to $250, depending on the device and location. Expect annual testing, which includes a pr... Read More

Tankless water heaters heat water instantaneously without the use of a storage tank. When a hot water faucet is turned on, cold water flows through... Read More