How to Install a Gas Line: Safety Tips and Best Practices?
To safely install a gas line, always turn off the gas, hire certified professionals, and follow best practices like using proper materials, conduct... Read More
Same-Day Service Available
Need a Plumber in Knoxville? We’re Ready to Help!


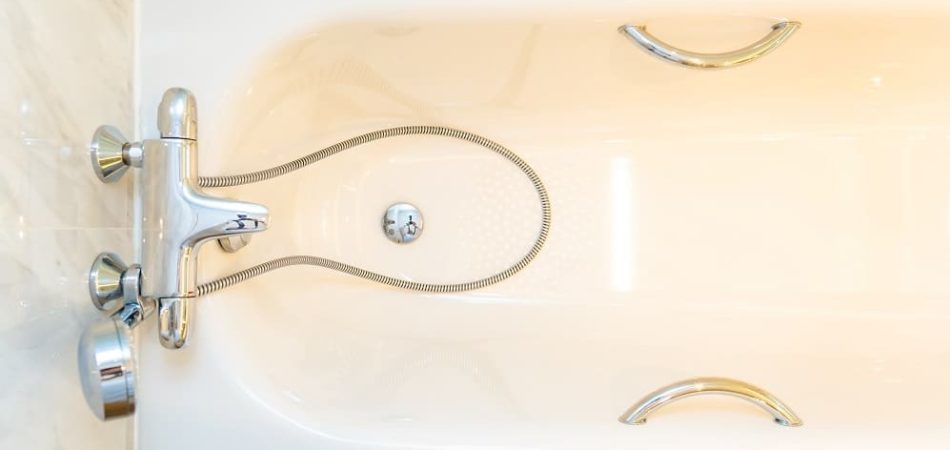
Installing a bathtub drain in Knoxville means matching the drain to your tub, removing the old stopper and flange, cleaning the opening, sealing a new flange with plumber’s putty, tightening it with a drain wrench, reconnecting the drain and overflow, and testing for leaks. Done correctly, these steps prevent hidden water damage, support smooth drainage, and help your bathtub last longer without costly repairs.
Installing a bathtub drain involves connecting the drain assembly and making a watertight seal so water flows directly into the plumbing system without leaking. It takes basic tools, some preparation, and precise steps. It begins with a level bathtub and a clean drain hole.
A drain flange will normally be sealed with a plumber’s putty to prevent leaks and then tightened into place. The drain shoe and waste pipe are then aligned and connected, and all slip nuts must be tightened to prevent loosening. Ultimately, leak testing ensures a long-lasting installation.
Tennessee Standard Plumbing understands that a proper bathtub drain installation protects your home from water damage, supports smooth drainage, and helps your tub last for years. Our approach focuses on careful sealing, accurate tightening, and thorough testing to guarantee dependable performance.
For expert help or a professional bathtub drain installation in Knoxville, contact us today!
Get the tools and parts together for a bathtub drain installation. You need a screwdriver, drain wrench, or pliers, a putty knife, and penetrating oil. Having everything ready avoids interruptions during the process and allows each step to be completed efficiently. Gather the new drain flange, gaskets, washers, and any necessary sealants to ensure a watertight connection.
Check the general dimensions of the drain to confirm compatibility. Standard drain opening diameters typically measure around 1.5 inches, while the drain pipe size usually ranges from 1.5 to 2 inches in diameter. Those dimensions are dependent on the tub type—standard or deep-soak—local plumbing codes – and pipe compatibility. Simple drain assemblies work well for standard tubs, but larger or deeper bathtubs with higher water volumes require stronger, larger drains. Proper preparation at this stage helps prevent future plumbing problems.
This precaution prevents small tools, screws, or debris from accidentally falling down the pipes while working on the drain. Protecting the overflow drain helps avoid clogs, potential damage, and extra cleanup, ensuring a smoother and safer installation process. It also allows for better focus on aligning and securing the new drain without worrying about losing parts in the plumbing system.
Lift-and-turn stoppers usually twist off, while push-pull or toe-touch designs may require pulling straight up. Unscrewing the stopper protects the finish of the bathtub and clears the drain opening for the new drain assembly. The process also identifies hidden problems like corrosion or buildup that need attention before proceeding.
Work slowly to avoid scratching or damaging the bathtub surface. Remove the old flange completely so the new drain fits properly and is watertight. Inspect the area for corrosion or buildup that may affect the installation of the new drain. This step prepares the groundwork for a leak-free replacement.

The new drain flange must have a clean, smooth surface to ensure a watertight seal. Use a putty knife or gentle scraper to remove stubborn residues without scratching the tub surface. Cleaning the area also allows for inspection of the pipe and bathtub for hidden damage that may need repair before installation.
This putty creates a watertight seal between the flange and the tub surface, preventing leaks and water damage. Make sure the putty is applied consistently to all areas of contact, and press the flange firmly into place. Proper application of the putty is essential to ensure the new drain sits securely, functions correctly, and lasts for many years.
Hand-tighten the flange to hold it in place while ensuring the plumber’s putty forms a complete seal around the edges. This initial placement ensures a leak-free installation. Adjust the flange if it is uneven; proper alignment now will prevent future leaks or drainage problems.
Excessive force cracks or damages the bathtub surface; work carefully while confirming the flange is level. Correctly tightening the flange seal prevents leaks and maintains water flow.
Step 9: Remove any excess plumber’s putty
Use a putty knife or a soft cloth to clean the surface, leaving a neat, smooth finish. Removing the extra putty prevents buildup and keeps the bathtub surface clean, ensuring both a functional seal and a visually appealing result.
Check that the stopper opens and closes correctly and fits securely within the drain. A properly installed stopper completes the drain assembly, allowing controlled water flow while preventing leaks and maintaining optimal bathtub performance.
Check underneath the tub and around the flange for any signs of leaks or water seepage. Running water through the newly installed drain confirms that all connections are secure and the plumber’s putty or sealant is holding properly. Inspecting at this stage helps catch potential issues before they cause damage or require rework.
Slightly tighten the flange to improve the seal, or remove and reapply plumber’s putty or silicone sealant as needed. Ensuring a watertight connection at this point prevents water damage to the subfloor and surrounding areas, thereby guaranteeing a long-lasting and reliable drain installation.
The part of the tub where water flows out after use is called a bathtub drain. It guides water safely from the tub into your home’s plumbing system. A stopper on the drain usually holds water in the tub while you bathe or releases it when you are done.
This comprises the drain flange, the stopper mechanism, and the drainpipe under it. Bathtub drains are usually made from durable materials like brass, PVC, or stainless steel. A proper seal is essential to prevent leaks and avoid water damage around the tub.
Bathtub drains also help prevent clogs and keep your plumbing system running smoothly when they are properly maintained. Some drains incorporate strainers to catch hair and debris before they reach the pipes. For convenience, modern designs include lift-and-turn, push-and-pull, or toe-touch stoppers. Routine cleaning and inspection prolong drain life and prevent repairs.
The replacement of a bathtub drain increases drainage efficiency and prevents costly repairs down the road. With time, bathtub drains rust, clog, or develop leaks that prevent water flow and cause hidden damage. A new drain installation restores functionality and cleans your bathroom.
Following are the reasons that you should need to replace a bathtub drain:
Ongoing leaks around the drain allow water to seep beneath the tub surface, causing structural damage, rotting subfloors, and expensive repairs if left unaddressed.
Rust or corrosion signs on the drain indicate long-term deterioration that weakens the drain and affects performance and appearance.
Older or damaged drain components trap debris more easily, causing recurring blockages that interrupt daily bathroom use.
For bathroom updates, replacing an outdated drain ensures a modern design while improving reliability.
A mismatched drain and tub or plumbing setup results in improper sealing, drainage issues, and the need for additional modifications.
A failing drain collects moisture that breeds mold and increases the cost of long-term maintenance. Timely drain replacement safeguards your bathroom investment and ensures trouble-free daily use. Installing a new, high-quality drain prevents damage, maintains proper function, and protects your bathroom upgrade.
The different types of bathtub drains are designed to suit various bathtub styles, plumbing setups, and user preferences. Each type serves a specific purpose, from preventing clogs to controlling water flow efficiently. Choosing the right drain ensures proper drainage, reduces maintenance issues, and enhances the bathtub’s overall functionality.
The different types of bathtub drains are:

They are ideal for traditional tubs, and they are simple to operate and require minimal maintenance.
A sleek option suitable for modern bathrooms, allowing for quick opening and closing with a single push.
They are perfect for users who want hands-free operation by pressing with the foot and are great for contemporary tubs.
A classic choice is the older-style bathtub, which provides reliable drainage control through a lever on the overflow plate.
They are best suited for a seamless look, commonly used in high-end or modern tub designs, and can be easily controlled by a lever mechanism.
They are suitable for deep tubs, using an internal plunger mechanism to provide strong sealing and effective drainage.
Pick a drain type based on cleaning ease, long-term durability, and style to match your bathtub and bathroom decor. These factors help your drain work efficiently while adding character to the space.
The right tools are essential for installing a bathtub drain and preventing leaks. Proper tools ensure alignment, secure connections, and a watertight seal reducing the risk of future plumbing issues.
The tools you needed to install a bathtub drain are:
A drain wrench is used to loosen or tighten the drain flange securely without damaging the tub surface.
A screwdriver is needed for removing or attaching screws on the drain stopper or overflow cover.
It helps to tighten fittings, nuts, or connections for a secure, leak-free seal.
It is essential to scrape off old plumber’s putty, clean the drain opening, and apply new sealant evenly.
It forms a watertight seal between the flange and the tub, preventing leaks.
It helps work on larger plumbing connections beneath the tub.
The bucket catches any water that may drip during removal or installation.
Cleaning clothes helps keep the work area clean and removes excess putty or sealant.
Trim excess putty or sealant for a neat finish.
They provide tight thread connections and prevent minor leaks.
Simple drain assemblies work well in standard bathtubs and offer simple drainage. For larger or deep-soak tubs that hold more water, robust, higher-capacity drains are recommended to ensure fast and efficient water flow, preventing overflow or slow drainage.
Remove an old bathtub drain by first clearing the area around the drain and gathering the necessary tools. Unscrew or pry out the existing drain carefully to avoid damaging the tub. Clean the opening thoroughly before installing a new drain.
Follow these steps to ensure a safe removal of your old bathtub drain:
Use a screwdriver, drain wrench, pliers, putty knife, and penetrating oil to make the removal process efficient and avoid delays.
Unscrew or lift it out, depending on whether it’s a lift-and-turn, push-pull, or toe-touch style.

Allow it to sit for several minutes to help break down corrosion or mineral buildup, making it easier to loosen.
Insert a drain wrench or pliers into the flange crossbars and turn counterclockwise, taking care not to scratch or damage the tub’s surface.
Remove the old drain flange and clean the opening thoroughly with a putty knife and cleaner to remove old putty, debris, and residue, ensuring a new watertight seal.
Look for rust, cracks, or structural damage that may require repair before installing a new drain.
Call a licensed plumber if the drain is rusted solid or if you notice any signs of serious damage. A professional has the right tools to remove corroded parts without damaging your tub. They also inspect for hidden plumbing issues beneath the tub, such as leaking pipes, deteriorated seals, or structural damage that may not be visible. This helps prevent future leaks and costly repairs.
To prepare the drain area for installation, follow the professionally advised steps. A smooth, debris-free surface not only helps the drain fit correctly but also reduces the likelihood of water leaks and long-term plumbing problems.
To prepare the drain area for installation, the steps are:
If the shower or tub base isn’t sloped correctly, water may pool instead of draining away. This leads to standing water, mold growth, and long-term structural damage. Ensuring the proper slope directs water efficiently toward the drain helps maintain a clean, dry, and problem-free bathroom floor.
To connect the drain to the overflow pipe, follow a strategic process. A drain pulls wastewater directly out of the fixture, while an overflow pipe prevents backups if water levels rise too high. These components form an integrated system that protects against flooding and keeps water flowing smoothly.
Review the manufacturer’s instructions carefully before installing anything. These guidelines apply to parts that are designed to fit and will not leak. Even slight variations in drain or overflow components require unique installation steps. Following these directions helps avoid costly mistakes and extends the life of your plumbing setup.
A new bathtub drain leaks if inadequate sealing, loose fittings, or defective parts allow water to escape into the subfloor or walls, causing moisture damage and a risk of mold. Fixing these issues quickly prevents expensive structural repairs and water waste.
Loose or improperly tightened drain connections allow water to slip through small gaps. The solution is to tighten the locking nut and make sure every fitting is fully secure.
If there is not enough plumber’s putty or silicone sealant, the drain will not have a strong seal, and water will seep underneath. Removing the drain, applying fresh sealant, and reinstalling it properly fixes this issue.
When the drain or pipe connections are misaligned, water escapes through the joints. Adjusting the alignment creates a tight fit and stops the leak.
A cracked or damaged drain flange lets water bypass the seal altogether. Replacing the defective flange ensures a watertight connection.
Using older, incompatible plumbing parts with a new drain prevents proper sealing. That’s solved by swapping them for new, correctly sized fittings.
 Excessive movement in the drain assembly, typically caused by loose or unsecured pipes, will eventually break the seal. Stabilizing the pipes underneath the tub helps keep everything in place.
An incorrectly installed gasket or washer leaves gaps that allow water to escape. Reinstalling it in the correct position prevents further leakage.
Hidden damage to the tub or shower base allows water to travel through unseen cracks. These surfaces must be repaired before the new drain is installed to prevent future leaks.
Each of these problems forces water beneath the tub, where it soaks the framing and flooring. Addressing them early prevents mold growth, structural rot, and costly repairs. For fast diagnostics, lasting repairs, and professional installations in Knoxville, contact Tennessee Standard Plumbing. We provide trusted local plumbing service with same-day scheduling, expert workmanship, and affordable rates.
The bathtub drain assembly directs water from the tub to the plumbing system. This consists of the drain flange, stopper, gasket, overflow plate, and connecting pipes. Together, they stop leaks, control water flow, and protect floors and walls from water damage, while providing good drainage and a watertight seal for safe everyday use.
You protect the bathtub surface during installation by placing a towel, drop cloth, or non-slip mat inside the tub to prevent scratches and chips. Masking tape around the drain area protects against this. Avoid dropping heavy wrenches or pliers, and handle all tools carefully to prevent damage to the tub surface during installation.
Yes, you need gloves for drain installation because they protect your hands from sharp edges, rough threads, and chemical sealants. Gloves also improve grip on tools, help handle rusted or tight fittings safely, and prevent cuts or scrapes while working in confined spaces.
Additionally, wearing gloves keeps hands clean from putty, debris, and residual water, reduces the risk of skin irritation from prolonged contact with plumbing materials, and provides extra comfort during extended installation tasks, ensuring that every step is performed safely, efficiently, and with better control over delicate components.
The best tool to remove a stuck drain is the drain wrench, also known as a drain key. The device fits snugly into the drain crossbars and provides steady torque to loosen the flange without damaging the tub. Penetrating oil and a wrench help with the removal.
This method minimizes the risk of damaging the tub’s surface or plumbing, allows for precise control while turning stubborn drains, and ensures the flange comes out intact, making the replacement or repair process faster and safer for both standard and deeper bathtub installations.
Yes, vinegar helps loosen a stuck drain by dissolving mineral buildup and light corrosion. Pour it around the drain flange, let it sit for 15–30 minutes, then flush with hot water. For heavily rusted or tightly stuck drains, a wrench may still be necessary to free the flange completely.
To unscrew a bathtub drain, insert a drain wrench or pliers into the flange crossbars and turn it counterclockwise. Apply steady, even pressure, and use penetrating oil if corrosion makes it hard to move. Move slowly to avoid scratching or damaging the bathtub surface while loosening the drain.
Fixing a leak by removing the flange, cleaning the drain opening, and applying new plumber’s putty or high-quality silicone sealant will fix a leaking drain. Replace the flange with care, avoiding overtightening that could crack the tub.
Replace damaged gaskets, washers, or flange components to restore a watertight seal. Ensuring all connections are aligned and tightened correctly prevents future leaks, protects the subfloor from water damage, and maintains smooth, efficient drainage over time, keeping the bathtub fully functional and safe for everyday use.
To fix water pressure issues after installing the bathtub drain, check for debris in supply lines, faucet aerators, or partially closed shutoff valves. Flush the water lines and inspect the pipes for any obstructions or corrosion. Clearing these blockages or cleaning the affected pipes usually restores proper water pressure quickly.
The correct order to assemble drain parts involves placing the drain flange and gasket in the tub opening and attaching the waste shoe, overflow tube, and tee fitting. Then install the overflow cover plate and stopper mechanism. Seal all parts to prevent leaks.
Proper assembly prevents standing water and water damage to the surrounding subfloor. Following this sequence reduces installation errors and extends the life of the bathtub drain system.
Yes, installing a bathtub drain is possible with the right tools, proper guidance, and careful attention to detail, particularly when aligning the drain and creating a secure, watertight seal.
The installation is simple to do—prepare the drain opening, apply plumber’s putty or silicone sealant, and tighten all fittings correctly. It is a long-lasting solution. A proper alignment with the tub and plumbing system prevents leaks and promotes easy drainage, making the bathtub safe for daily use.
No, plumber’s putty should not be reused because once it has been applied and removed, it loses its ability to form a proper, watertight seal. Reusing old putty can cause leaks, water damage, and improper drainage over time.
For every new installation or drain replacement, fresh plumber’s putty must be applied to ensure a secure, long-lasting seal. Using a new putty protects your bathtub, plumbing, and surrounding areas from potential damage and costly repairs.


To safely install a gas line, always turn off the gas, hire certified professionals, and follow best practices like using proper materials, conduct... Read More

To install a shower drain, position the drain body, connect the outlet to the waste pipe with proper slope, secure it with a locking nut, and use g... Read More

Tankless water heaters heat water instantaneously without the use of a storage tank. When a hot water faucet is turned on, cold water flows through... Read More