How to Diagnose and Fix Water Pressure Issues at Home
Many people suffer from terrible water pressure without realizing that it can be easily solved by a plumbing expert. Many of the homes where we ... Read More
Same-Day Service Available
Need a Plumber in Knoxville? We’re Ready to Help!


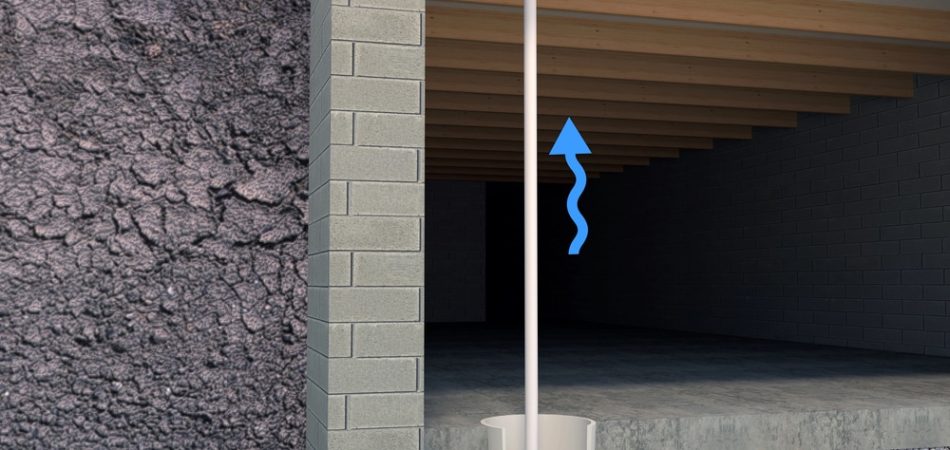
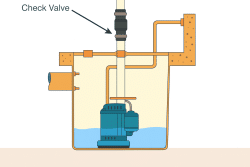
The height to install a check valve on a sump pump is 6 to 12 inches above the pump on the vertical discharge pipe. This specific placement stops water from falling back into the sump pit when the pump shuts off. That action, called “backflow,” causes the pump to short-cycle and wear out too quickly.
The check valve sits above the normal high water level inside the pit. Positioning it higher keeps the valve dry and prevents sludge or debris from settling on the flapper inside. Making service easier, a homeowner accesses it without standing in a full pit of dirty water.
Generally speaking, this 6 to 12-inch zone offers the best balance between stopping backflow and reducing pressure on the pump, which is crucial for the long-term health of your system, particularly because a homeowner wants reliable basement protection. Indeed, one finds that this guideline applies to almost every standard residential installation.
Tennessee Standard Plumbing provides some of the highest-quality sump pump check valves available. They engineer their valves to withstand constant use, ensuring reliable, long-lasting flood protection for any house. The brand is giving homeowners excellent peace of mind with durable, professional-grade parts.
Protect your basement the right way—get expert sump pump and check valve installation from Tennessee Standard Plumbing. Book your service today and keep your home safe, dry, and disaster-proof.
The check valve height matters on a sump pump because incorrect placement directly affects the pump’s lifespan and efficiency. Setting it too low allows a large column of water to fall back into the pit, and setting it too high makes the pump work harder than necessary. Correct height ensures the pump runs for the shortest, most effective cycles.
The following are the reasons that explain why check valve height matters:
Backflow happens when the water that a pump pushes up the discharge pipe falls back down into the pit after the pump turns off. This valve, placed correctly, acts like a one-way gate. It closes fast when the pump stops, stopping the water from returning. When the water stays up in the pipe, the sump pump does not need to start pumping again right away.
Short-cycling means the sump pump turns on and off too quickly and too many times. This happens when the backflow fills the pit enough to trigger the pump to start again almost immediately. Placing the check valve high enough cuts down the amount of water that returns. Less returning water means the pump runs less often and for longer, proper cycles, which helps prevent premature motor failure.
A water hammer is a loud banging noise that occurs when a fast-moving column of water suddenly stops inside a pipe. This shock wave happens inside the pipe when the pump shuts off and the check valve snaps closed. Positioning the valve 6 to 12 inches above the pump helps cushion this water, stop a bit, making the noise much quieter. A gentle stop protects the entire plumbing system.
The pump’s motor and bearings are the parts that let the shaft spin smoothly. Short-cycling causes the motor to start repeatedly under high stress. Those frequent, high-stress starts put tremendous wear on the motor and its bearings. Therefore, reducing short-cycling by having a proper check valve height keeps the internal parts much cooler, which naturally extends the life of the entire pump.
Quiet discharge means the water leaves the home and the system without making a racket. A lot of that noise comes from water hammer and the vibration from a pump that starts and stops too fast. When the check valve is in the sweet spot, it manages the returning water column best. Because the system runs more smoothly and the pipes shake less, the whole operation stays noticeably quieter.
 The factors that affect the right check valve height are mainly related to the physics of the water system and the size of the plumbing components. The standard rule works for most homes, but certain setup variables sometimes require a small adjustment to that measurement.
The following are the factors determining ideal placement:
A deeper pit means a taller column of water, creating greater back-pressure. Positioning the valve closer to the 12-inch mark minimizes the volume of water that returns to the sump when the pump shuts off.
A wider pipe holds more water. Because of that, a system with a larger diameter discharge pipe benefits from the valve being placed higher to cut down on the returning volume and stop it from overfilling the pit.
A more powerful pump, measured by GPM (gallons per minute), moves water with greater force. That added power means the pump can handle a slightly longer cycle, so placing the valve higher helps manage the speed of the backflow.
Most folks use a common swing check or spring-loaded valve. A spring-loaded valve closes faster, reducing water hammer more effectively, which occasionally allows for a slightly lower placement.
The total distance the water travels horizontally or vertically up to the discharge point is the run length. A longer run holds more water; therefore, the valve needs placement toward the higher end of the range to prevent excessive backflow.
Install a check valve at the perfect height with simple steps that guarantee a smooth-running system and a long pump life. Because the process involves cutting the existing pipe, good measurement and careful alignment make all the difference.
The following are the essential steps for installation:
Locate the vertical pipe 6 to 12 inches above the sump pump’s outlet. Measure the length of the new check valve and mark the discharge pipe to match that distance; that is the section you remove.
Use a permanent marker to clearly indicate the two spots where you must cut the PVC pipe. Cutting the pipe straight ensures the new couplings fit tightly and do not leak.
Put the valve and its couplings onto the pipe without gluing or tightening anything yet. This lets you check that the cut section is correct and the valve sits.
They put a small arrow on the side of every check valve. This arrow shows the direction water must flow, so make sure the arrow points up toward the discharge point outside the house.
Secure the valve in place. Hand-tighten the rubber couplings around the pipe on both ends of the valve. Use a screwdriver to finish tightening the metal clamps evenly until the valve stays firmly in position without moving.
The installation errors that damage your check valve setup are often simple mistakes in assembly that cause it to fail quickly or run loudly. Even a small alignment issue creates excessive stress on the pump, reducing its lifespan.
The following are the most common errors to avoid:
This is when the flow arrow points down instead of up. When this happens, the valve cannot open, and the pump runs against a closed gate, which causes the motor to overheat and fail almost right away.
Placing the valve too far above the 12-inch mark increases the load the pump lifts. The pump runs inefficiently and wears out fast because it works too hard lifting the heavy water column.
The clamps hold the valve to the pipe. If they are not tight enough, pressure causes the connection to leak or even blow apart during high-volume pumping, causing a basement flood.
They create uneven stress on the couplings and the valve itself if the pipe sections do not line up perfectly straight across the valve. This leads to early leaks or mechanical failure inside the valve.
A union allows a homeowner to easily remove the entire pump for service without cutting the pipe. Skipping this fitting makes future maintenance much harder, as one has to cut the plumbing just to pull the pump.
Measure the right height to install a check valve on a sump pump with careful attention to detail. Precise placement forms the foundation of a reliable system, because accurate measurement stops backflow and guarantees the pump discharges water efficiently every time. Achieving this height precision requires referencing several points, not just the floor of the pit.
To measure for the perfect check valve placement, use these steps:
Use a tape measure to find the exact starting point where the discharge pipe connects to the pump. This is zero for your upward measurement.
Before cutting, measure the length of the new check valve. You must subtract this from your target height (e.g., 10 inches) to mark the lower cut point on the pipe.
Make sure the final position leaves enough room above the valve to easily reach and loosen the hose clamps without obstruction.
The installed valve must sit higher than the typical standing water level in the pit. This keeps the internal mechanism free from floating debris.
Before finalizing the spot, ensure the top of the valve and the pipe fittings will not touch or interfere with the sump pit lid when it is put back on.
When homeowners want the absolute best performance for their drainage setup, they rely on Tennessee Standard Plumbing. This company offers complete sump pump services, from precise check valve installation to emergency repairs. They guarantee every setup meets the highest industry standards for water management and compliance.
Yes, you can install two check valves at different heights on a single sump pump line, and it is a recommended practice in certain situations, such as in deep well systems or for added redundancy.
If a check valve is installed too high, water from the discharge pipe will drain back into the sump pit, causing the pump to cycle on and off frequently (short cycling). This can lead to premature wear and failure of the pump.
For vertical setups, spring-assisted (axial flow or silent) check valves and vertical lift check valves are generally recommended, with spring-assisted valves offering the most flexibility regarding installation height and flow conditions.
You know your check valve is installed backward because the sump pump will run, but no water leaves the pit. The reversed valve acts like a completely closed barrier, stopping the discharge flow. The pump quickly builds up pressure, overheats, and burns out the motor very fast. One must look for the flow arrow on the valve body; it absolutely needs to point up and away from the pit.
Your sump pump runs constantly even after you installed a check valve because a persistent leak exists either inside the valve or within the pump system. The valve itself might not seal fully due to debris caught in the flapper, allowing water to trickle back. Alternatively, the water source entering the pit exceeds the pump’s capacity. That continuous running signifies a severe blockage or a broken component, causing inefficiency.
Yes, a sump pump repair service fixes issues caused by incorrect check valve height easily and effectively. A qualified plumber quickly measures and cuts the discharge pipe to reset the valve within the correct zone. They also inspect the pump for damage, replacing parts like motor bearings or switches that wore out due to short-cycling before the adjustment. It’s a fairly standard repair for them.
You replace your sump pump check valve roughly every five to seven years, or sooner if noise or backflow starts. The internal flap or spring inside the valve wears out from constant movement, and seals degrade over time. If a homeowner hears loud water hammering after the pump shuts off, the valve likely needs replacement. Proactive replacement prevents serious pump damage down the road.
Yes, you can install a check valve outdoors on your sump pump line, but you must take precautions to prevent freezing. In cold climates, placing the valve in an unheated area risks freezing the trapped water, blocking the discharge pipe. Install the valve inside the basement or use heat tracing cables and insulation on any outdoor section. Protecting it from the elements is essential for year-round function.


Many people suffer from terrible water pressure without realizing that it can be easily solved by a plumbing expert. Many of the homes where we ... Read More

A 2025 booster pump installation cost includes the pump itself, labor, and other components like pipes and electrical work, with the total price va... Read More

Plumbing leak detection equipment works by monitoring water flow, pressure, sound, or temperature to identify abnormalities that indicate a leak. C... Read More